


In this tutorial, you will learn how to manage your development projects more efficiently, with a Version Control System named Git. We will show you how to install and how to use it.
Why Git?
When you are developer, working on various different projects or even writing occasional scripts is a common thing.
Plus, you will never write a program, in one shot, which will be instantly perfect. You will get back to your code many times, modifying functionalities, and removing bugs.
This process might become a mess if you are not organized and don’t control your workflow.
To do so effectively, you must have a tool for helping you to maintain your development cycle.
In today’s business, every software development team is using such kind of tool for preserving backup copies of source code, for controlling deployment versions, and for collaborating among programmers.
Although there are many products with similar functionalities on the market, we chose Git, mainly because it’s free and Open-Source, second, it’s relatively easy to use.
In summary, Git keeps track of the history of your changes to the files and folders, preserving backup copies of your code on your local hard drive, as well as on the cloud.
Moreover, it allows you to roll back a program to its previous working state if something suddenly went wrong. Finally, you could collaborate with your team, sharing your code online, and deploy easily your project on any machine, from the cloud.
How to install Git
1) Download Git.
https://git-scm.com/downloads
2) Install, leaving all options by default.
3) Once installed, open Git Bash from the Start menu.
4) Run the following command inside Git Bash, It will confirm that the installation was successful, showing the installed version of Git.
git --version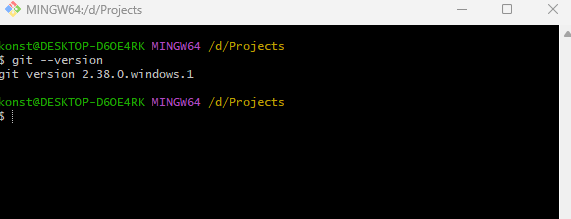
How to work with Git
Git was initially made to work in command line. Although there are some GUI tools, you could explore them on your own, if you wish. Here we will show you the basics, which will work everywhere.
In summary, you have to follow those 3 main steps for every project:
- Point Git to the project’s directory
- Add your project to the Git
- Check status and confirm
Let’s see an example
Say, you have a project on your local machine, inside the following directory:
D:/Data/Projects/MyProject
1) First, you will point Git to your project directory, to monitor all of its contents.
Open Git Bash, and type the following command, in order to move to your projects root folder.
cd d:/data/projects2) Now, point Git here.
git init3) Add your specific project to Git.
git add d:/data/projects/myproject4) Check the status.
git statusThis will list the content of your project that is ready to be added to the Git database
5) Confirm the addition.
git commit -m "Project added to Git"“Project added to Git” is a required comment for each addition. You can change the text of the comment as you wish.
Now when you work further on your project, after each important change, repeat the steps 3 to 5.
What’s next?
Now that you have an idea on how Git works, you you can manage your source code on your local computer. How about having a copy of your project on the cloud?
That’s what we will explain in the next tutorial: [Working With GitHub]
Bonus content
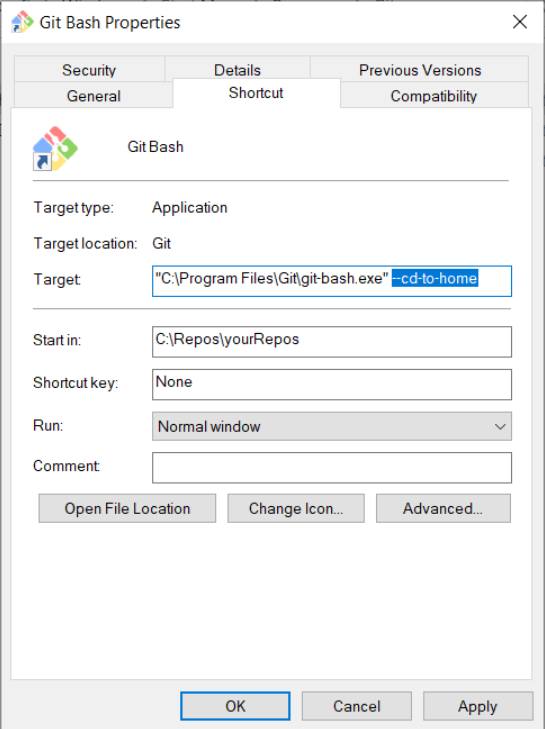
How to change the default directory of Git Bash to your projects directory
Get to the Properties of the Git Bash icon and do the following:
Delete: -cd-to-home value.
Set your projects directory in Start in setting.
Restart Git Bash (close and open Git Bash window).
How to remove (delete) a file from a project?
git rm MyFile git commit -m "Deleted unneeded file." How to rename a file?
git mv OldFileName NewFileName git commit -m "Renamed file OldFileName"If you have files in a folder that you don’t want to track?
echo FileToIgnore > .gitignore git add .gitignore git commit -m "Add .gitignore file, ignoring FileToIgnore" The commands above will add the filenames that you want to ignore in the.gitignore hidden file, created in your project’s directory.
Then .gitignore file will be added to the Git.
Revert changes to a file and return it to its original state
1) Check Git Status
git status 2) If the file is not yet at the Staging level
git checkout MyFileName 3) If the file is at the Staging level
git reset HEAD MyFileNameRevert last change after Commit
git revert HEADRoll back the change and restore the old file
You are working on a single file that has already changed 10 times in its history, and you have made changes to Git 10 times using commit
For some reason, you want to revert the file to the state it was in before, say, the 5th commit.
1) View history in Git
git log -10 10 is the number of recent changes you pull from the log. Each commit is assigned an ID (40 characters)
2) Get the information about the change we need.
git show [ID] 3) If this is what we need, we roll back the file
git revert [ID]How to set Notepad++ as Git default text editor for the comments?
Open Git Bash and run the command:
git config --global core.editor "'C:/Program Files (x86)/Notepad++/notepad++.exe' -multiInst -notabbar -nosession -noPlugin"